How to use Dewalt Miter Saw – Ultimate Guide
If you are looking for a complete guide on how to use Dewalt miter saw then you are in the right place. I know you might be very excited as the tool you bought just arrived and you can’t wait to see it working. Well, you need to use it properly to get the most out of your miter saw.
How to use Dewalt miter saw
- Mark the piece of wood you want to cut
- Place it on the table of the saw
- Ensure accuracy
- Press the power button to power the blade
- bring it down slowly and carefully towards the cutting point
Yes, it is that easy to use your Dewalt miter saw. However, before you wear your safety glasses to give it a try there is something else you need to know. So if you want to learn everything about your Dewalt miter saw then keep on reading.
How Many Types of Miter Saws are there?
Before using a DeWalt miter saw you need to know what kinds of miter saws are available on the market.
Now if you are someone who already has made a choice then you don’t need to read this portion. Feel free to skip this portion and move on to the next one. However, if you still want to read it then the choice is yours.
So basically there are the following types of miter saws available on the market. Each one of them has its own set of pros and cons.
Dewalt Single Bevel Miter Saw
A single Bevel DeWalt Miter saw is the one that features bevel cutting at one side only. You can use such type of tool for various applications. It will help you produce efficient bevel cuts but at a bit slower rate.
Examples of Single Bevel Miter Saw – DEWALT 12-Inch DWS715
DeWalt Dual Bevel Miter Saw
In contrast to a dual Bevel Miter saw there is one more type that can tilt in both directions.
If you want to learn more about the Dual bevel miter saw, I have written a detailed guide. You can read it to clarify any confusion you have.
Dual bevel saws are quite in handy when it comes to finishing projects quickly. They also have much better accuracy as compared to single bevel devices.
Example of Dual Bevel Miter Saw – DEWALT DWS716XPS
DeWalt Sliding Compound Miter Saw
DeWalt has taken things to a bit higher level with their sliding compound miter saws.
Sliding compound miter saws are available in all major miter saw brands. It is a special type of miter saw that can slide in and outward.
It allows you to work on your projects more efficiently. With a little extra cost, you can get a perfect machine that will make your job not only easy but also very accurate.
A sliding compound miter saw can work on heavy-duty projects. Moreover, with special types of miter saw blades, you can even convert miter saw to cut metal.
Example of Sliding Compound Miter Saw – DEWALT DWS779
Selecting the Right Type of Dewalt Miter Saw
Now that you are aware of different types of miter saws you need to pick the one that suits your needs. However, if you are already having one then you don’t need to follow this step, just as I mentioned earlier.
Having that said, if you are learning to use your saw before buying it then you need to decide on the right type of miter saw for your needs first.
Luckily you don’t need to worry as I am going to give you a few basic indications that will help you select the right saw. First of all, if you are a DIYer then you don’t need to invest in a very heavy-duty sliding compound miter saw.
If you can afford one that’s totally fine but there is no need to take such a huge step right in the beginning. In addition to this, if you are a professional but on a tight budget then the single bevel miter saw can be a really nice option for you.
It will take your job to a whole new level and allow you to make some really smooth cuts. Apart from that, those who prefer a professional touch more than the cost can go for Sliding compound and dual bevel miter saws.
How to Unlock Dewalt Miter Saw

The first thing that you need to learn before using your miter saw is how to unlock it. Unlocking your miter saw may seem a bit difficult at first, especially when you haven’t used any miter saw before.
However, it is super simple than you may even think.
I will explain it in a super simple and step-by-step way to make it easy for you.
Unlocking the Head of Your Miter Saw
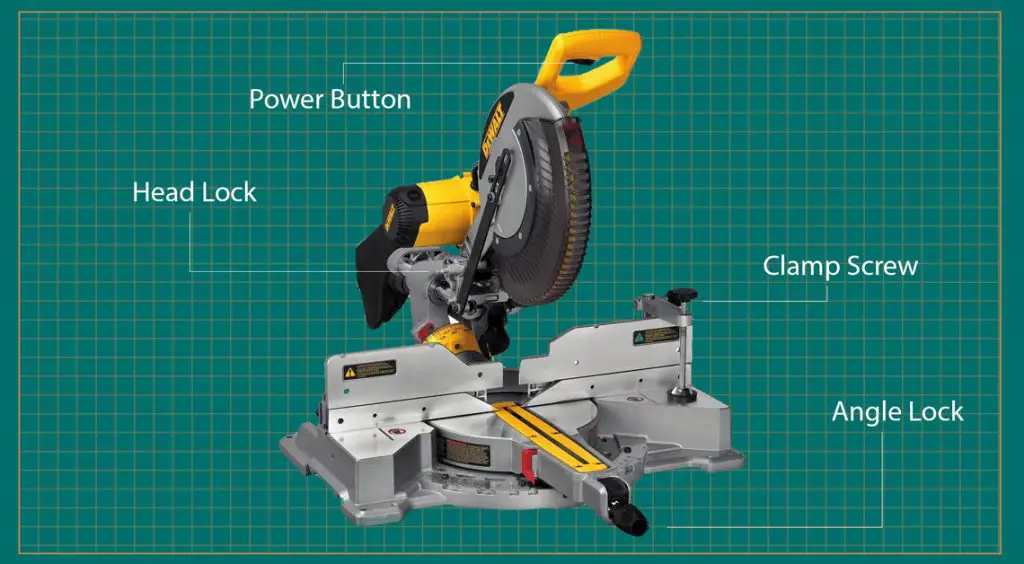
The first thing that you need to unlock is the miter saw’s head. Now by default, it comes locked to ensure safety and protect the tool. However, it doesn’t need a lot of effort to unlock it. You can unlock it by locating a safety pin on the saw.
Once you have located the safety pin or knob you need to put a little pressure on it. After that, you need to move the knob and you will get the head of your miter saw unlocked.
Unlocking the Angle
Dewalt miter saws also come with an angle lock system. It ensures the safety and helps you provide better outputs on the projects. To unlock the angle lock, you need to locate the locking pin or knob in the front of the saw.
Once located, you need to push the pin and it will unlock the angle adjustment. You can adjust the angle and set it to whatever you need for the project. Once you are done with that you can lock it back.
Unlocking the Bevel Angle
Miter saws feature adjustable bevel angles. You can unlock the bevel angle on your DeWalt miter saw using the lock pin or knob. This is the easiest part to unlock when it comes to unlocking the DeWalt miter saw.
However, some miter saws don’t come with the bevel adjustment. You should double-check before using your miter saw. If your saw has a bevel adjustment option you can follow this step otherwise you can skip it.
Safety Consideration Before Using a DeWalt Miter Saw
Although miter saws may not look very harmful, however, looks can be deceiving sometimes. Without safety precautions, one must never use a miter saw.
It is because the blade spins with an RPM of 1400 which is able to cut through several different substances.
With such a high RPM and powerful motors, these saws can be extremely dangerous. Therefore you need to take proper safety measures before using the saw. It is always better to be safe than sorry.
1. Always Use Proper Hearing and Eye Protection
Wearing ear and eye protection is crucial when it comes to using any kind of tool. The louder sound that your saw produce can permanently damage your hearing. Therefore, you need to be very careful unless you are tired of listening to this world.
But no matter how fed up you are, I still recommend wearing the proper hearing protective equipment as one should always be grateful for properly functioning body parts.
In addition to this, eyes are also extremely important. During woodworking projects, small chunks of wood can fly in random directions.
You need to wear safety goggles before working on such projects. If you don’t wear your safety glasses you may have an extremely worst experience sooner or later.
2. Never Ever approach the tool with crossed hands
One of the most common mistakes that I don’t know why some people make every time. Whenever they are going to cut a piece of wood they will cross their hands to hold the piece and operate the saw.
This is an extremely risky situation as it can lead to cutting your whole hand if anything goes wrong. You should always approach the saw with straight hands rather than crossed hands. It is also very easy to hold the wood piece and operate the saw with straight hands.
3. Maintain distance from the blade
Always make sure that your hands are as far as possible from the saw blade. The high-speed rotating blade will be so angry that it won’t notice whether it is your hand or a piece of wood. You need to be very careful while cutting anything on your saw.
Typically Dewalt miter saws usually have safety marks. You need to respect every single one of them and follow them. If you buy any DeWalt miter saw you will see a small line on the table of the saw right in front of the fence.
This indicates the safer spot where you can keep your hand. Always hold your wood piece from the indicated position. If your saw doesn’t have any safety marks (which rarely happens) then you need to maintain at least six inches distance from the blade.
4. Remove Any Loose Item That You Are Wearing
If you are wearing any loose item please don’t approach your miter saw. I’ve noticed that the value of gravity between any loose items and the spinning miter saw blade becomes doubled.
Yes, I am not joking, if you are wearing any loose jewelry, wristwatch, or even clothes you need to remove that as soon as possible. It is because these free items can lead to disasters anytime anywhere.
5. Keep Your Saw Somewhere Secured
Always make sure your saw is somewhere secured before using it. You should always avoid putting your saw on surfaces that can wobble like light tables etc.
If you don’t have a solid surface to place your miter saw you can buy a miter saw stand.
DeWalt produces some premium quality miter saw stands that will help you in such situations. If you fail to keep your safe at a fixed and solid spot then a number of different things can happen.
Wobbling can reduce your work accuracy and ruin your project. In addition to this, you can also hurt yourself.
How to Use Dewalt Miter Saw
Now that you are already aware of the basics let’s see how to use DeWalt miter saw. Using it doesn’t involve any special technique. As long as you abide by the basic rules that we’ve already discussed you will be fine.
Step 1- Mark the Piece of Wood You Want to Cut
Before you start working on the project make sure you have marked the pieces accurately. Accurate measurements are very important in woodworking as a slight bit of inaccuracy can lead to wasting the wood.
So before starting out take your measuring tape and a pencil and mark the pieces as accurately as possible. Once you feel good enough you can move on to step 2.
Step 2 – Adjust the Saw
The next step is to adjust your miter saw. This is the step where you can adjust your miter saw for different cutting angles. You can adjust the slide (if you are using the sliding miter saw).
Apart from that, make sure you have set the right bevel and miter angle before working on the project. Safety and checking are very important because unfortunately, we don’t have a ctrl + z button in real life.
Step 3 – Place it on the Table of the Saw
Once you have marked the piece that you want to cut. The next thing that you need to do is to place that piece on the saw table right below the blade.
Make sure it touches the fence of the saw to keep it secured and firmly during the process.
Keep your workpiece as static as possible to minimize risk and ensure safety.
Step 4 – Ensure accuracy
Don’t rush it as accuracy is very important throughout the task. In order to ensure accuracy one last time I highly recommend bringing the blade down all the way to the wood once.
Check carefully if the blade is targetting the exact marked spot. If it isn’t you still have time to adjust the cutting subject according to the situation.
Once you are confident about the accuracy of the project you can take the blade back to its initial position. As the blade reaches back to its initial position prepare for step 5.
Step 5 – Press the power button to power the blade
Once the blade is back to its initial position you can start working now. In order to power the blade, you need to press and hold the power button.
As soon as you press the button you will hear the sound of the motor. This is the part where your saw may jerk to the back a bit. You don’t have to worry about it as it is mainly due to the torque of the motor.
There is nothing to worry about because the poor motor is only obeying the laws of physics and keeping momentum conserved.
Step 6 – Bring it Down Slowly and Carefully Towards the Cutting Point
Once you’ve powered the blade and it is at its full speed you need to bring it down slowly. Slowly and carefully bring it all the way down and beyond the wood.
The blade will rip the piece and you need to leave the power button after that. Once the blade stops you can take it back to its original position.
Please be very careful about the speed of the blade. If you try to bring it back without stopping it may throw the piece of wood at a very high speed.
This can lead to a very serious situation and critical injuries may occur.
Conclusion
How to use Dewalt miter saw? Well if you are a newbie you will most probably be looking for such a tutorial. Luckily I’ve got you covered with my in-depth article. I’ve tried my best to write down everything that you need to know before using your saw.
Always make sure you are following the right technique. This will make you complete your projects without any problem. At the same time, the right approach to any tool can minimize the risk of injuries to a significant amount.
This sums up my today’s tutorial for how to use Dewalt miter saw. I hope you will have learned a lot of things from this article.
If you think there is something more I can add to this article please feel free to let me know in the comments below. I will love to add and make the article as informative as possible.


